In the 4th season of the show Silicon Valley, Jian Yang creates an app that checks whether an object is a hot dog or not a hot dog. Here, we'll show you how you can also build a very simple version of it yourself in 30 minutes without knowing anything about Machine Learning, AI, or how to code.
How to build a machine learning web app using Bubble
Stuff that you’ll use
Here are some tools/concepts that will be involved in making this app:
- IBM Watson — most famously known for defeating Ken Jennings on Jeopardy, Watson is IBM’s Artificial Intelligence platform. You are going to ask Watson to do the heavy lifting of checking whether something is a hot dog or not.
- Deep Learning/Machine Learning — the way that Watson will actually recognize a hot dog. Basically, Watson has looked at lots and lots of images of various things (including hot dogs) and has learned to classify what’s in those images, so it will tell you whether it thinks there is a hot dog in there.
- Bubble — the code-free framework that you will use to build your app. This app will allow users to upload an image, then will send the image to Watson for processing, then display the results received from Watson.
- API — the way that things talk to each other on the Internet. In this case, your Bubble app will talk to Watson by plugging into its API.
Steps that you’ll take
This is the process that you'll follow:
- Create a Watson account — 2 minutes
- Make a new Bubble web app — 2 minutes
- Connect the Bubble app to Watson — 5 to 10 minutes
- Build the app UI — 5–10 minutes
- Set up the app workflows — 2–5 minutes
- Check an image — 1 minute
The build walkthrough process
1. Create a Watson account
The first step is creating an account with Watson and creating a project in your account:
- Go to the Watson Visual Recognition homepage and click “Get Started Free”.
- Sign up by filling out the form and verifying your email address.
- Once you are signed up, a “Watson Vision” project should be automatically created for you and should see a screen like this one. Click the “show” button located in the top right of the Credentials section, which will display your API key. Copy that key, you’ll need it in the next step.
2. Make a new Bubble web app
Building an app on Bubble is a relatively easy process but has a few steps to it, so I’ve made my hot dog app public and read-only, so that you can reference it throughout. The first step is creating an account and a new app:
- Go to Bubble and sign up for a free account.
- Create a new app and give it any name.
- Click the button on the left side to start the app from a blank page.
- There are 7 tabs in Bubble (Design, Workflows, Data, Styles, Plugins, Settings, and Logs). Out of those, we will only use 3 for this app:
- Design — this is where you set up what your app looks like. You will use this to create the UI to upload an image, push a button, and have the result displayed.
- Workflows — this is where you set up what actions happen in your app. You will use this to send the image to Watson and receive the results.
- Plugins — this is where you set up any external integrations for Bubble. You will use this to set up the connection to Watson.
3. Connect the Bubble app to Watson
Now, you should connect the Bubble app to your Watson account by following these steps:
- Go to the Plugins tab in Bubble, click on Add Plugins in the top right corner, search for “API Connector” and add it to your app. The API Connector will allow you to connect the Bubble app to any modern API, in this case Watson.
- Click “Add another API”. When when one is added, change the name of the API from “New API” to “Watson” (name doesn’t matter).
- Underneath you’ll see the first call, pre-named “API Call”. First, a little explanation of what a “call” is — it’s basically one system sending some data to another system and receiving a response. For example, if you were to connect to Uber’s API, you may want to make one call to get a rate quote for a ride from one address to another and then another call to actually request a ride. You might also have lots of other calls for whatever Uber allows you to do through their API. In Watson’s case, you will be making only one call to recognize the contents of an image, which will involve you sending Watson that image and receiving the list of things that Watson thinks are in that image.
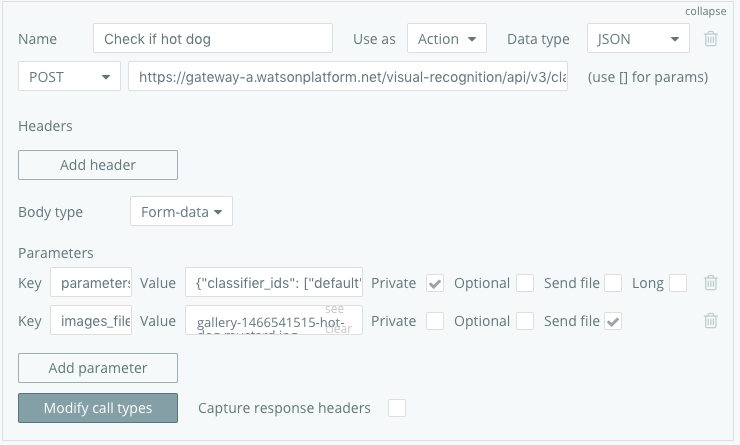
- Go ahead and expand the API Call in order to set it up. If you are familiar with how APIs work, you can get all of the values you need to enter here. OR you can just use the values I give you below.
- Change its name to “Recognize an image” (name doesn’t matter).
- Change “Use as” to “Action” — that’s purely to tell Bubble that you will be using it in a workflow (more on that below).
- Change the dropdown to the left of the URL from GET to POST. This just means that you’ll be sending some data to Watson (our image) instead of purely asking for some data.
- Enter the following URL: https://gateway-a.watsonplatform.net/visual-recognition/api/v3/classify?api_key=[YOUR API KEY FROM ABOVE]&version=2016–05–20. This is the URL that the data will be sent to.
- Click on the Body type dropdown and choose Form-data. This is the format in which the data attached to the call will be sent.
- Click Add Parameter twice to create two parameter fields (the data you will send to the URL). Enter the following values for it:
- First parameter: Key = parameters, Value = {“classifier_ids”: [“default”]}. This tells Watson to classify an image using its standard classifier. (classifier is how Watson figures out what’s in an image). This works for things which Watson can recognize, like hot dogs. For things that Watson doesn’t know how to recognize, there is a way to teach it by creating your own classifier. More on that in the next article.
- Second parameter: Key = images_file, uncheck the “Private” box and check the “Send file” box. Now for the Value field, just upload any image file from your computer that you want Watson to process.
- Feel free to reference my app here or the screenshot below to make sure that you’ve set everything up properly.

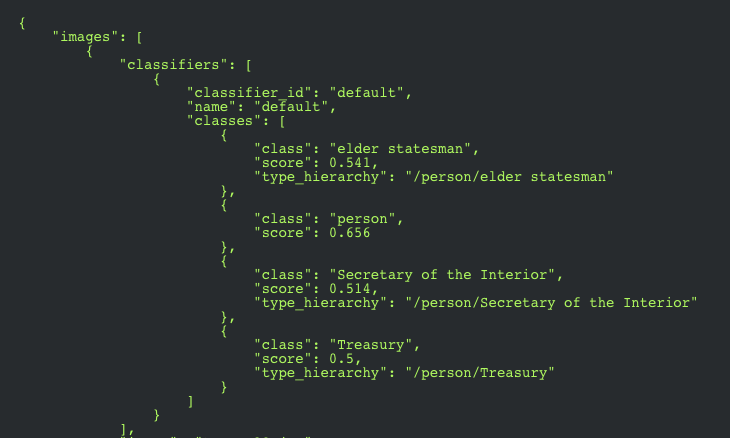
- Press the Initialize Call button. This will make our first API call to Watson, sending it the image you uploaded above. If the call is set up properly, you’ll see a window show up with a bunch of fields. Scroll down and click “Show raw data”, which will show the raw data received by Bubble (see image below). This looks complicated but it isn’t. Basically Watson is just saying that it thinks there is a 54.1% chance that the picture has an “elder statesman” in it, a 65.6% chance it has a “person” in it, and so on. Push the Save button to finish initializing the API call.

4. Build the app UI
Now it’s time to build a very simple UI with only 4 elements that our users will interact with (see my UI here).
- Go to the Design tab.
- Drag and drop a Picture Uploader from the left menu to the canvas. This is where our users will upload their images. Quick note: the picture uploader (as well as other things you add) will look differently than mine, we’ll address that below.
- Add a Button. This is what users will click to check the image. Change its text to something like “Hot dog?”.
- Add an Alert. Alerts are text that is invisible by default but show up for a certain number of seconds when needed. This first alert will show up when there is a hot dog in the picture, change its text accordingly.
- Add another Alert for when there is not a hot dog in the picture.
- Feel free to double click on any of the elements above and click “Remove style” under the Style dropdown. This will allow you to manually control the look and feel of the elements.
5. Set up the app workflows
Now that the UI is set up, you should connect everything with workflows, which means that you will specify what should actually happen when the user clicks the button (see my workflow here).
- Go to the Workflows tab.
- Add an event — you only need one here and it should happen when the user presses the button. So, choose Elements > Element is clicked and then make sure to select your button.
- Now you need to add the series of actions that will execute when that button is clicked. There will be 3: a) send the image to Watson and get a response b) show the “hot dog” alert if Watson thinks it’s a hot dog c) show the “not hot dog” alert if Watson doesn’t think it’s a hot dog.
- For the first action choose Plugins and then the Watson API call you created earlier. You’ll have to fill in the image that should be sent — use the dynamic link option (because you want the image to be different every time), then click “Insert dynamic value” and then choose the picture uploader element’s value. That will make sure that whatever image people upload will be sent to Watson.
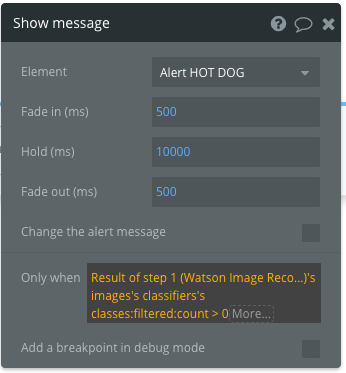
- For the second action choose Element actions > show message. Then select your “Hot dog” alert and change the hold time to 5,000 or 10,000 ms (just to make sure that the alert stays visible for a bit).
- You will need to make sure that the second action only happens if Watson think the image has a hot dog. So, you will need to fill in the “Only when” part of the action. Remember that when you make an API call to Watson, it returns a bunch of text similar to the screenshot above. Bubble will need to look at that text and see if there is a class called “hotdog” that was included. The way to construct that expression is as follows: Result of step 1's images' classifiers' classes' :filtered (class=hotdog):count>0. What that says in human speak is look at that piece of text that was returned, go to the images section, then to the classifiers section within that, then to the classes section. Within the classes section find all entries where the “class” field has the value of “hotdog”. Then check to see if there are more than 0 of those entries.

- Now, right-click the action you just created and copy it. Go to its right, above “Click here to add an action” text, right-click, and paste. You just need to change two things: a) The element from the “hot dog” one to the “not hot dog” one. b) The end of the condition from being “>0” to being “is 0”.
6. Check an image
Your app is ready! Now its time to see it in action:
- Click the Preview button, which will open the public preview of the app in a new tab.
- Upload an image, click the button, and wait for the answer!
- Hopefully the app worked beautifully and you can now use the full power of Watson to recognize tubular processed meats from other things. If something seems to be broken, remember that you can always refer to my app here.
To share the link to your app with others, just copy the preview URL and remove ?debug_mode=true. After this, your URL will look something like hotdog.bubbleapps.io/version-test. You can also get rid of the version-test part by deploying your application to live through the dropdown in the top right that says “Development” (click on it, then on “Deployment and version control”, then “Deploy Development to Live”). After you do that you’ll have two versions of your application: one at the /version-test URL (meant for development and testing) and one at the top-level URL (meant for people actually using it). If you want, you can also put this app on your own domain after subscribing to one of Bubble’s paid plans, the $16/month one should work fine.
If you're looking for professional Bubble developers, we can help: hire us as your full-service Bubble agency or hire individual Bubble freelancers through our Flex program.


