In this article, we'll walk through our process of building a basic version of Uber in Bubble. Since this is a bird’s-eye view of how to build Uber, we'll stay on a relatively high level and cover a few core features that make up most of the app, such as application flow, data structure, and workflows.
How to build an Uber-like app using Bubble
The Uber app building workflow process
1. Application flow
Let’s first figure out the core functions of the app. Based on our experience, there are 6 functions that are most important:
- Signing up as a rider — this is the simple signup process for a rider
- Signing up as a driver — this signs up the user as a driver prior to approval of identity verification
- Approving a driver — this changes the driver into a “verified” driver who can start accepting ride
- Requesting a ride — this is initiated by a user
- Accepting a ride — this is how driver accepts a request
- Completing a ride — this is when the trip is finished and becomes a “past” trip
2. Data Structure
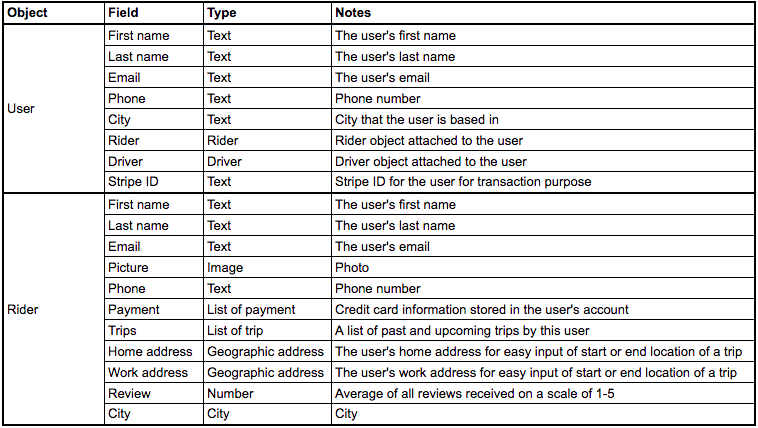
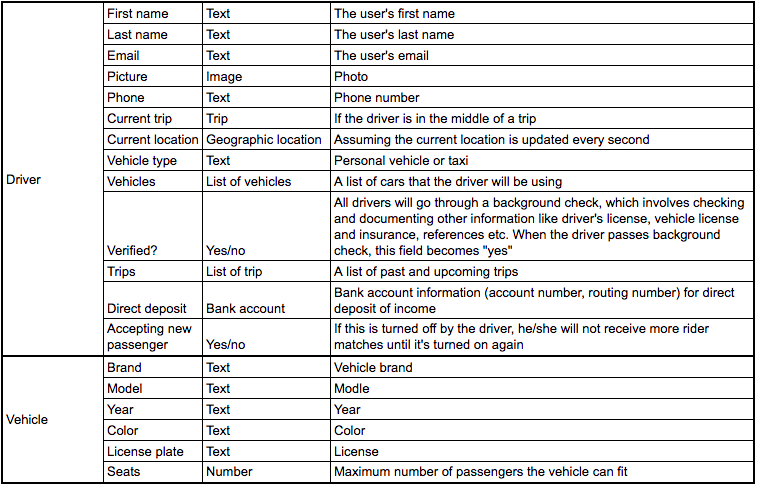
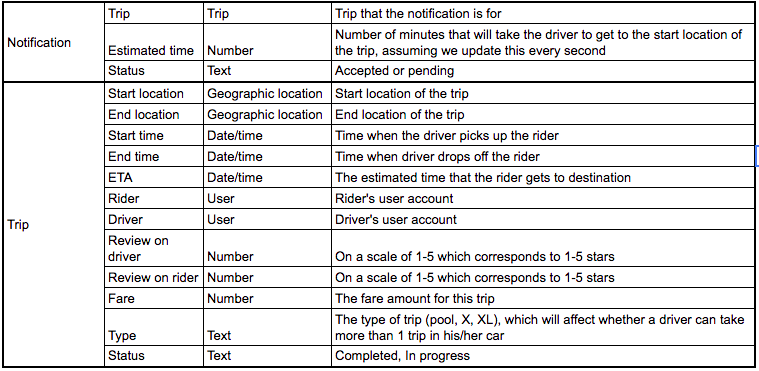
Next, let’s figure out how the database should be structured. Before listing out all the fields, we want to first think through what objects are needed based on the above functions:
- User: this is the account that a rider or driver object is attached to, that includes the user’s email for login
- Rider: this is a rider object that stores all the necessary information of a rider
- Driver: this is a driver object that stores all the information related to a driver
- Vehicle: this stores information about each vehicle that a driver registers
- Notification: this is the notification object that is created for each requested ride, which may include information like start and end location of the trip for the driver’s information before the driver accepts the trip
- Trip: this includes all the information about a particular trip
For simplicity’s sake, we won’t list all the detailed fields for every object (for example, a driver’s social security number). Instead, we've listed the fields that would comprise the core functionalities that we've mentioned above for each data object.


3. Workflows
Now we'll going to walk through the core functions we mentioned in the Application Structure section.
1. Signing up as a rider
When a user clicks the “Sign up” button, the app will perform two workflow actions:
1) Create a new rider object by filling in the fields below:
- First name
- Last name
- Email
- Phone
- City
2) Create a new user object with the same fields as a rider, plus:
- Rider = Result of step 1 (This is the rider object that we just created.)
2. Signing up as a driver
If a user signs up as a driver, the app will also conduct two workflows:
1) Create a new driver object by filling in the fields:
- First name
- Last name
- Email
- Phone
- Verified? = no — this will be set to yes once the driver passes the verification process by Uber
2) Create a new user object with the same fields above excluding Verified?, plus:
- Driver = Result of step 1 (This is the driver object that was just created.)
Once the driver and user objects are created, the user can go into his/her account and update the rest of the information such as vehicle information. Right now, the driver is not verified by Uber yet, so the driver won’t be able to access the function to accept a ride.
3. Approving a driver’s verification
Because Uber needs to verify all of the driver’s identity and vehicle information before they can start driving, after a driver signs up and fills out information, Uber will conduct a background check on the driver. When the driver passes this background check, Verified? field changes to “yes”, which allows the driver to start accepting rides.
4. Requesting a ride
I’m going to use UberX as an example to illustrate how a ride is requested:
1) The start location input defaults to the user’s current geographic location but can be changed
2) User inputs an address in the destination input box
3) Fare gets calculated and shown to the user along with the trip ETA (Fare is calculated based on 6 metrics by Uber in the background, but for simplicity’s sake, let’s assume that both fare and ETA are calculated based on distance)
- Fare = distance * unit price (e.g. $1/ mile)
- ETA = current date/time + distance / speed (e.g. 0.2 mile/ min)
4) When the user clicks on the “Request” button, a new trip is created with the following fields:
- Start location
- End location
- Start time = current date/ time
- End time — leave empty
- ETA = calculated as ETA based on distance (distance / speed)
- Rider = the user that requested the ride
- Driver = current driver
- Review on driver — leave empty
- Review on rider — leave empty
- Fare = calculated fare
- Type = UberX
- Status = In progress
5) Now we can start searching for the nearest driver based on his/her Current location and check if the driver is available:
- Calculate the distance between the driver’s Current location and the Start location of the trip
- Current trip is empty
- Accepting new passenger = yes
A notification is created and sent to the driver who has the minimum distance between the driver’s Current location and the trip Start location. Trip field is set as the new trip that was just created, and Status of the notification is set as “pending”. Certain trip details are sent to the driver:
- Start location — this is grabbed from the start location of the trip of the notification object
- End location — this is grabbed from the end location of the trip
- Estimated time — calculated by distance and speed
- Type of request — this is grabbed from the trip
- Rating of the passenger — this is grabbed from the rider’s rating
5. Accepting a ride
When the driver accepts the ride, several workflows happen:
1) Change notification’s Status to Accepted
2) Change the driver’s Current trip to the notification’s trip
3) Change the notification trip’s Status to “In progress”
4) Rider receives an alert saying that the trip has been formed and will be able to see driver’s information, both parties can call each other
6. Completing a ride
When the rider gets dropped off at the destination, the driver clicks on “Complete ride” button, which triggers several workflow actions:
1) Change trip End time = current date/ time
2) Status = Completed
3) Review function is enabled for both parties. The ratings will be stored as these fields when each party finishes rating the other:
- Rating for driver
- Rating for rider
4) The rider’s credit card gets charged the amount of the Fare.
On the app, “Past trips” are filtered if their Status is set to “completed”. Both parties can then view the details of this trip in their “past trips”.
So far, we have walked through the basic but core functions of Uber, since at Airdev we believe building an application should start from the minimum viable product. Of course, you can layer more functions on top of this basic version if you would like to include other fancy features such as rider passes. But hopefully this is helpful for you to think through how to build a basic version of Uber in Bubble!
If you're looking for professional Bubble developers, we can help: hire us as your full-service Bubble agency or hire individual Bubble freelancers through our Flex program.


